This page in: English - Deutsch - Español - Français - Italiano - Lietuvių - Nederlands - Norsk - Polski - Русский - Svenska - Tiếng Việt - عربي - 日本語 简体中文
通过 FTP 快速安装
- 警告: 由于可能碰到文件上传错误(损坏),FTP是不推荐使用的方法,如果可能,你应该使用 通过 shell 安装 ,FTP是最后的选择。
- 尽管该一步一步安装指南乍看起来相当复杂,如果你按照指南一步一步往下走,不用担心会出现问题,所有工作都会相当平顺。开始安装之前你应该阅读 安装需求 检查系统要求。
- 第1步
- 如果你要在生产环境中使用CMSMS,请下载稳定版本的CMSMS:latest stable release 。
- 第2步
- 使用Unzip/untar软件将下载的zip/tar文件解压倒你的计算机的一个目录下,所有的文件都将保存在一个名为 'cmsmadesimple' 的目录中。
- 第3步
- With your FTP program, upload all files in the exact same structure to the root (preferred) or to a subdirectory on the server where you want to install CMSMS. If you are using a hosting provider the root directory will be public_html. Locating the files in public_html will make your site available to users as www.domain.com. If you create a sub-directory below public_html (eg. public_html/somename) your web site will only be available the sub-directory as www.domain.com/somename.
- Tip: If you have control panel access (e.g. CPanel, DirectAdmin, etc.) to your website you can FTP the relevant install or diff ".tar.gz" file to the root directory (e.g. public_html) or sub-directory on your web server. Then using your control panel's file manager you can extract the contents of the installation file. This will definitely be quicker than using FTP to upload all the individual files and probably more reliable too. Don't forget to delete the ".tar.gz" file from the server when you're done.
- Step 4
- For the script to access the folder properly, you need to change permissions of the following files and directories on the server. The required permissions are different, depending upon what account PHP runs under on your web server.
- If you do not know what user PHP runs as, ask your hosting provider or server administrator.
- If the web server process (Apache, for instance, often known as "httpd", "nobody", "www-data", etc) runs PHP and "owns" the files that it writes, then you'll need to use 777 permissions on directories that need to be writable, and 666 on files that need to be. The reason for this is, while you (your user) may own the directories and files, another user (the web server) needs to be able to write in/to them.
- CHMOD these directories to 777:
- tmp
- tmp/templates_c
- tmp/cache
- uploads
- uploads/images
- modules
- Notice : some hosting contexts may need the modules directory be chmoded 755 (or 775) instead of 777 in order to make modules (like the WYSIWYG TinyMCE editor) work.
- CHMOD?!? Well, in most cases you can alter the permissions by right-clicking in your FTP program on the directory or file in question, selecting CHMOD or File Attributes (or something similar) and enter 777 in the appropriate field. Otherwise, check the manual of your FTP program.
- If you (your user account) runs PHP (such as in a suexec PHP/cgi environment), then typically, no changes are needed on permissions of CMSMS files. Use permissions of 755 for directories, and 644 for files; and never CHMOD anything to 777. In this environment, PHP files (and the directories they are located in) can only be writable by the user; not by 'group', and never by 'other' (world-writable). If scripts seem to abruptly terminate and you see errors (500 status code) in your logs, it could be because a script or a directory containing one is writable by 'group' or 'other'.
- Step 5
- In a text editor (not a word processor), create an empty file named config.php.
- In Windows, open Notepad (comes with Windows) and immediately (without typing anything in the document) choose "Save-As" from the File menu. Choose a location to save the file to, and use "config.php" (including the quotes) as the file name to ensure the proper extension (.php) is used.
- Save (upload) that file to the CMSMS directory (same (sub)directory as in step 3).
- Set permissions of that file to 666.
- Check if the file you created has only .php as extension (some editors may append .txt file extension to the end of the filename). If necessary rename to config.php).
- Note: The only time you wouldn't need to create a config.php file is if the web server has access to write to that directory (in which case that file will be automatically created during the installation). More often than not, they don't.
- Step 6
- Create an empty database. Depending on your host you may use a program like phpMyAdmin, or your host's control panel.
- You can select any name, username, and password for the database (just make sure to remember it!). But to make it even easier when you install CMSMS (step 7-10), you can use the following:
- Database name: cms
- Username: cms_user
- Password: cms_pass
- Note: Some hosts only allow you to use one database. Then you will have to use that database (and the username and password that you use to login into your database). If that is the case, you can skip step 6. Only make sure to use a prefix for the tables (step 10 below) that separates the CMSMS tables from other tables that you also may be using in the same database.
- Some hosts provide for the creation of the database using the MySQL database function in the host's control panel. Creating the database may have to be done first, then when created, the user name and password are assigned. You may be required to precede the database name and user name with your host assigned user code. This is perfectly okay, but as indicated note everything carefully.
- Step 7

- Now, in your browser, type the URL of the directory where you put the files (step 3), e.g. http://www.yoursite.com/index.php. This should take you to the installation wizard. If it doesn't, go to http://www.yoursite.com/install/index.php
- Step 8
- Select your language. The next screen (see image to the right) is checking that you have set the correct permissions. If all tests are succesful, click Continue.
- If you receive any errors, make sure you've given the folders the correct permissions.
- Step 9
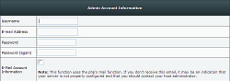
- You should now select a user name, e-mail address, and password for the admin.
- Note: this is for access to the CMS Made Simple administration once the installation is finished; these are not the user name and password that you gave when creating the database (step 6).
- Step 10

- In the next step you need to enter the database information. For Database name, Username and Password, enter the same information as when you created the database in step 6. In most cases all other settings can be left as they are. However, if your host forced you to include your user name as part of the database name and user name, then ensure they are entered exactly the same here.
- Ask your hosting company if you encounter difficulties.
- Note 1: Uncheck the box Create tables if you use an existing database with CMS Made Simple content that you don't want to remove (for example if you upgrade or repair). Otherwise leave as is. Tables from other systems, like a phpBB forum for example, will be unchanged and not dropped or deleted.
- Note 2: If you find you are not getting past this point, it may be that when you created the database (step 6) you didn't grant yourself permissions. It's insufficient simply to observe that the ALL check box has been ticked assuming that all permissions have been granted. You have to run a query, for which a go button may be positioned nearby that does this for you. Go back to the control panel (back to where you were before, eg. MySQLdatabase) and hit the go button.
- Step 11
- In the next screen, if all is [done], everything was installed successfully and CMSMS is ready for use! Congratulations!
- It is wise to write down the CMS Document root, the path to the Document root and the Querystring in case you need this information.
- Step 12
- Go to your FTP program again and set permissions for config.php to 444 for security reasons!
- Remove the /install directory completely!
- Step 13
- Go to your site and read the first page carefully.
- Have a look at the post installation optional settings like pretty URLs.
- Step 14
- Strange problems after an installation or upgrade are often caused by one or more files failing to upload correctly. Use the checksum file to verify that no files are missing or were corrupted in the upload.
- Download the appropriate checksum file from the Forge, e.g. cmsmadesimple-<version>-base-checksum.dat or cmsmadesimple-<version>-full-checksum.dat. If you have renamed your admin directory then open the .dat file in a text editor and search and replace "/admin/" with "/<my-admin-directory>/" (approx. 290+ instances).
- Now select the 'System Verification' link on the 'Site Admin' menu, locate your downloaded checksum.dat file and press submit. It may take a few seconds to return the results. If you have deleted the /install/ directory then those files will be reported as missing. You may also get told that various index.html files in the /tmp directory are missing or invalid/corrupt. Likewise with the SITEDOWN file.
- Note: the checksum only verifies the core and the core modules. Any additional modules you've added are not verified.
- This is also a useful check if you suspect your site has been hacked to help identify possible hacked files.
This page in:
English -
Deutsch -
Español -
Français -
Italiano -
Lietuvių -
Nederlands -
Norsk -
Polski -
Česky -
Русский -
Svenska -
Tiếng Việt -
عربي -
日本語
简体中文
