This page in: English - Deutsch - Español - Français - Italiano - Lietuvių - Nederlands - Norsk - Polski - Русский - Svenska - Tiếng Việt - عربي - 日本語 简体中文
Szybka instalacja przez FTP
Although this step-by-step guide seems rather intricate at first glance, if you work from step to step without worrying about the next ones, all should run smoothly. You could also check the requirements before you start.
Krok 1
Pobierz ostatnie stabilne wydanie jeśli chcesz korzystać z CMSMS w środowisku produkcyjnym.
Krok 2
Rozpakuj plik w katalogu na swoim komputerze pamiętając gdzie został zapisany. Wszystkie pliki zostaną zapisane w katalogu o nazwie 'cmsmadesimple'.
Krok 3
Przy użyciu klienta FTP, wgraj wszystkie te pliki zachowując taką samą strukturę, do katalogu głównego (preferowane) lub do podkatalogu na serwerze, na którym chcesz zainstalować CMSMS.
Krok 4
Aby skrypt posiadał prawidłowy dostęp do katalogu, należy zmienić uprawnienia następujących plików i katalogów na serwerze. Ustaw CHMOD 777 dla:
- tmp/templates_c
- tmp/cache
- uploads
- uploads/images
CHMOD?!? W większości przypadków możesz zmienić uprawnienia klikając prawym przyciskiem w swoim kliencie FTP na katalogu lub pliku, wybierając CHMOD lub Właściwości pliku (lub coś podobnego) i wstawiając 777 w odpowiednie pole. W przeciwnym wypadku, sprawdź instrukcję swojego klienta FTP.
Krok 5
W edytorze tekstu, utwórz pusty plik, nawywając go config.php. Zapisz ten plik w katalogu zawierającym CMSMS (ten sam (pod)katalog jak w kroku 3).
Ustaw uprawnienia tego pliku na 666.
Sprawdź czy utworzony plik ma tylko rozszerzenie .php (niektóre edytory umieszczają .txt po .php. Jeśli korzystasz z Notatnika, upewnij się, że zaznaczyłeś Wszystkie pliki (*.*) podczas zapisu pliku). Jeśli jest to konieczne, zmień nazwę na config.php
Note: The only time you wouldn't need to create a config.php file is if the web server has access to write to that directory (in which case that file will be automatically created during the installation). More often than not, they don't.
Krok 6
Utwórz pustą bazę. Depending on your host you may use a program like PHPMyAdmin, or your hosts control panel.
You can select any name, username and password for the database (just make sure to remember it!). But to make it even easier when you install CMSMS (step 7-10), you can use the following:
 * Database name: cms
 * Username: cms_user
 * Password: cms_pass
Note: Some hosts only allow you to use one database. Then you will have to use that database (and the username and password that you use to login to your database). If that is the case, you can skip step 6. Only make sure to use a prefix for the tables (step 10 below) that separates the CMSMS tables from other tables that you also may be using in the same database.
Step 7
Now, in your browser, type the URL of the directory where you put the files (step 3), e.g. http://www.yoursite.com/index.php. This should take you to the installation wizard. If it doesn't, go to http://www.yoursite.com/install/install.php
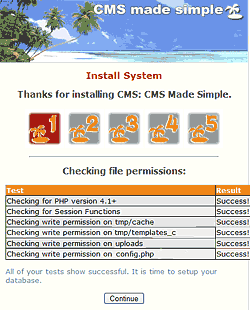
Step 8
The first screen (see image to the right) is checking that you have set the right permissions. If all tests are succesful, click Continue.
If you receive any errors, make sure you've given the folders the correct permissions.
Step 9
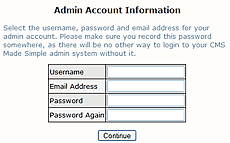
You should now select a user name, e-mail address and password for the admin.
Note: this is for access to the CMS Made Simple administration once the installation is finished; these are not the user name and password that you gave when creating the database (step 6)
Step 10
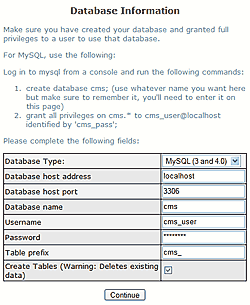
In the next step you need to enter the database information. For Database name, Username and Password, enter the same information as when you created the database in step 6. In most cases all other settings can be left as they are.
Ask your hosting company if you encounter difficulties.
Note: Uncheck the box Create tables if you use an existing database with content that you don't want to remove (for example if you upgrade or repair). Otherwise leave as is.
Step 11
In the next screen, if all is [done], everything was installed successfully and CMSMS is ready for use! Congratulations!
It is wise to write down the CMS Document root, the path to the Document root and the Querystring in case you need this information.
Step 12
Go to your FTP program again and set permissions for config.php to 444 for security reasons!
Remove the /install directory completely!
Step 13
Go to your site and read the first page carefully.
This page in:
English -
Deutsch -
Español -
Français -
Italiano -
Lietuvių -
Nederlands -
Norsk -
Polski -
Česky -
Русский -
Svenska -
Tiếng Việt -
عربي -
日本語
简体中文
