This page in: English - Deutsch - Español - Français - Italiano - Lietuvių - Nederlands - Norsk - Polski - Русский - Svenska - Tiếng Việt - عربي - 日本語 简体中文
Image Manager
Contents |
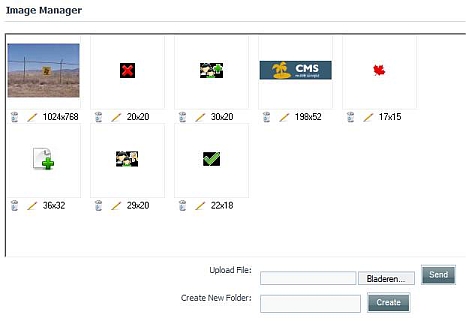
- From the Menu select "Content/Image Manager".
- The Image Manager lets you upload and browse the images on your server. That is all images that are in the folder (and its sub-folders) that you have set to be the image upload folder in config.php. Usually this is uploads/images/.
- For the Image Manager to work, PHP 4.3+ (older versions may work) is required, and either PHP built-in GD library, or NetPBM binary, or ImageMagick binary accessible by PHP. Binaries are the executable files for the web server.
- Ok, that may sound like Greek to a newbie. Suffice it to say that you most likely have GD installed, although it may not support the GIF format. GD is the image toolkit that is selected by default in CMSMS. If you want to change it you need to edit config.php.
- The following is taken from the documentation for the HTML Area Image Manager (link is not valid anymore) ([1]), which is the Image Manager that is used with CMSMS.
Do you have GD with PHP?
- You can check if GD is installed on your web server by creating a small PHP script to output the system parameters.
  <?php
  phpinfo()
  ?>
- Save the above code in a file name called phpinfo.php running this script on your web server (i.e. view the file on the web server using a web browser), look for the GD parameters, GD should be version, say about 2.0+. If you did not find the GD information, then GD is not installed.
- Note: If you do have GD, it is most likely that the GIF format is not supported. Only the older version of GD supported GIF, maybe when the patent for GIF expires, GD will support GIF. If you do have GIF support for GD, but don't be too happy, as it is also more likely that it doesn't support 24bit full colour JPEG functions in PHP.
- Update: Newer versions of the GD library have GIF support. If you have a version of GD older than 1.6 or newer that 2.0.28, then GIF support in enabled.
- But alas, if your PHP is in safe mode, GD may be the only option at the moment.
Or do you have NetPBM and PHP with safe mode OFF?
- If you want to use NetPBM, PHP needs to be able to execute commands on the command line. That is, if PHP is in safe mode, then it may not be possible to use NetPBM. Checking for NetPBM is trickier. I don't have any suggestions at the moment on how to check if NetPBM is installed.
- However, you can download the binaries for Win32 and Linux. Download NetPBM binaries
- If you are using FTP to upload, make sure that you upload them in binary mode. In addition, chmod 755 the binary files, so that they are executable.
Or do you want to use ImageMagick with PHP safe mode OFF?
- Well, this one is even more tricky. First, it is not the easiest, may be impossible, to install ImageMagick on a linux web server without proper access and permissions. Just uploading the binaries, if you can find them, will probably not work due to dependencies. On windows, it may work, just download the Win32 installer for ImageMagick and install it. This I have done before, and it works.
- Static ImageMagick binaries for linux may work. I have not tried it.
Which library to use if you have access to more than one?
- ImageMagic is preferred as it provides the best rotation algorithm. Below is a brief comparison of the image manipulation packages. Personal preference is ImageMagick. Comparing the abilities of three graphics libraries:
GD NetPBM ImageMagick GIF No Yes Yes JPEG Yes Yes Yes PNG Yes Yes Yes Cropping Good Good Good Scaling Fair Good Very Good Rotation Poor Fair Very Good Flip Good Poor Good
- Comparing the abilities of three graphics libraries.
- 1 GIF is support in old GD say version 1.61 and below.
- 2 Full colour JPEG is not supported in GD versions less than 2.01 with PHP.
Thumbnails not working?
- You may have to change File Creation Mask (umask): from "022" to "002" to keep from getting 403 forbidden errors when trying to view generated thumbnails on my remote webhost. Also clear the site cache after making this change, these are both found under "Site Admin/Global Settings".
Add Image
- To add an image, do like this:

- Browse to the folder where you would like the image to be uploaded to.
- Click the "Browse" (the dutch "Bladeren" in this picture) button on the line where it says Upload File: below the image browser.
- Browse to the image file that you would like to upload.
- Click Send.
- Note: You can also do a "Create New Folder" which make it easier for you to keep pictures together in folders.
- Note: If you have a lot of imageas to upload, it is probably faster to use the File Manager. With the File Manager you can upload 5 images at a time (you can set the number in the File Manager Settings tab (max 10)). And if you really have a lot of images to upload, use FTP.
- Note: The maximum size of images that can be uploaded is set in config.php (in bytes). Your server may also limit the file size that can be uploaded, which may create errors if larger files than this limit are uploaded.
Edit Image
- Once you have uploaded images you can edit them by clicking on the edit icon http://www.cmsmadesimple.org/lib/filemanager/ImageManager/img/edit_pencil.gif under each image. The image will then be shown in a popup window with a toolbar with six options.

- This is what you can do:
Crop:
- To crop an image, select Crop in the toolbar. Draw a box with your mouse to select what part of the image to keep. The part of the image within the rectangle is what will be kept and the greyed-out area outside it will be removed from the image. You can change the size of the rectangle by dragging the small boxes in the corners and along the sides. You can also move the part of the image to be kept by clicking in the rectangle and drag it.

- When you have selected what area of the image to keep press the OK button and your image will be cropped. To cancel any changes instead press the Cancel button .

Resize:
- Resizing an image is good if you’d like to reduce the file size of a large image. To resize an image, select Resize in the toolbar http://www.cmsmadesimple.org/lib/filemanager/ImageManager/img/scale.gif. To make the image smaller or bigger, drag the boxes in the corners or along the sides of the image. By default proportions are constrained. To resize an image without keeping the proportions untick the Constain Proportions box.

- You can also manually type the pixel width and height in the respective fields at the top.
- To confirm the resize click the OK button. Or click Cancel to leave the image unchanged.
Rotate:
- To rotate an image, click Rotate in the toolbar http://www.cmsmadesimple.org/lib/filemanager/ImageManager/img/rotate.gif. If you want to flip the image, select Flip Horizontally or Flip Vertically in the drop-down box Flip Image. You must click the OK button for the changes to take effect.
- If you want to rotate the image, select any of the options in the drop-down box Rotate Image. Or you could type any number from 1 to 360 in the field for angle to rotate. You must click the OK button for the changes to take effect.
Measure:
- You can use the measure tool http://www.cmsmadesimple.org/lib/filemanager/ImageManager/img/measure.gif to determine the angle and to get information about the distance in pixels between two points of your image.
- X and Y show the coordinates of the point where you first click (starting location). W and H show the horizontal and vertical distance respectively between imagined horizontal or vertical lines along the two points. A shows the angle (relative to the axis) and D the total distance in pixels between the two points.
- Once you have made a measure you can click on rotate and the angle of the measure is selected in the rotate image field.
Marker:
- By clicking on the marker tool in the toolbar http://www.cmsmadesimple.org/lib/filemanager/ImageManager/img/t_black.gif you select if the marker lines will be black or white.
Save:
- Naturally, clicking Save http://www.cmsmadesimple.org/lib/filemanager/ImageManager/img/save.gif saves the changes you have made to the image. If you just close the window without clicking Save, the changes you have made will not be saved.
This page in:
English -
Deutsch -
Español -
Français -
Italiano -
Lietuvių -
Nederlands -
Norsk -
Polski -
Česky -
Русский -
Svenska -
Tiếng Việt -
عربي -
日本語
简体中文
