This page in: English - Deutsch - Español - Français - Italiano - Lietuvių - Nederlands - Norsk - Polski - Русский - Svenska - Tiếng Việt - عربي - 日本語 简体中文
Shell installation
- Although this step-by-step guide seems rather intricate at first glance, if you work from step to step without worrying about the next ones, all should run smoothly. You could also check the requirements before you start.
- If you are upgrading then it is recommended you back up the database. Also, if you have an admin theme then this will also need to be saved (an upgrade overwrites the default)
- Step 1
- Login to your shell account via ssh (or telnet if you must)
cd 'your-www-root-directory'
- Step 2
- Note: From version 1.4+ the archive does not extract into its own cmsmadesimple-x.y.z directory as previous versions did so any files will be loose in the directory they were extracted in.
- You can install CMS Made Simple in your www-root or create a subdirectory called whatever you choose. For the purposes of this tutorial, if you are not installing in the www-root then create a new sub-directory (example cmsmadesimple) and cd into it:
mkdir cmsmadesimple; cd cmsmadesimple
- Note: If you get an error message similar to the following:-
mkdir: cannot create directory `cmsmadesimple': Permission denied
- then it means that you need to run as a different user. <Gently> If don't understand the previous sentence you need to do a little reading on Unix file permissions and users. Most likely you will only run into this problem if you are hosting CMS Made Simple on your own server. The solution is check the ownership of the directory you are working in, and run as that user (su). This "might" be apache, or www-data, depending on the web server setup. Do not run as root - apart from the security risks it will require chown-ing the changed files afterwards.
- Step 3
- Check the latest release tar.gz link from latest stable release if you want to use CMSMS in a production environment.
- There are 2 versions: base version (contains english language only) and full version (contains all language translations)
- The link above takes you to a download page displaying many alternative links. Make sure your browser is displaying the url of any links that you hover over - in Safari, you need to display the Status Bar. Hover over the link for the latest filename ending in tar.gz, see what url is displayed and note the ID number in the middle of the url. This ID is the key to uploading to your server the correct tar.gz file. At the time of writing (August 2008) the ID number is 2536.
- (If using Safari, and doubtless other browsers, you can Ctrl-click on the link and then save the whole url as a bookmark.)
- In your ssh window issue a command like the following, with the current ID number and CMSMS version number replacing the numbers you see here:
wget http://dev.cmsmadesimple.org/frs/download.php/2536/cmsmadesimple-1.4.1-full.tar.gz
Note - the latest release is now hosted on amazon so you will need
wget http://s3.amazonaws.com/cmsms/downloads/7205/cmsmadesimple-1.9.4.1-base.tar.gz
(tip: copy the link address from the download page)
- Check the file is there in the current directory:
ls
- Extract the files using the following command (but obviously replacing "1.4.1-type" with the current CMSMS version number:
tar -zxf cmsmadesimple-1.4.1-full.tar.gz
- Step 4
- Once the files have extracted, you need to change permissions of the following files and directories. (Note: 777 has pontential security risks and may allow hackers to upload files to these directories to run phishing sites etc. If security of your web site is important, set these folders to CHMOD 775 or tighter.)
chmod 777 tmp; \
chmod 777 tmp/templates_c; \
chmod 777 tmp/cache; \
chmod 777 uploads; \
chmod 777 uploads/images; \
chmod 777 modules
- Notice : some hosting contexts may need the modules directory be chmoded 755 (or 775) instead of 777 in order to make modules (like the WYSIWYG TinyMCE editor) work.
- Note: If you know that php is run with your own user permissions you can skip this and the next step. Also note that you can chown these directories to whatever user apache runs as to accomplish an appropriate permission scheme. For example, chown -R www-data tmp or chown -R www-data uploads, would give these directories to an appropriate user under Ubuntu, and you wouldn't then need to open them up to 777.
- Step 5
- Issue
touch config.php; chmod 666 config.php
- Note: The only time you wouldn't need to create a config.php file is if the web server has access to write to that directory (in which case that file will be automatically created during the installation). More often than not, they don't.
- Step 6
- Create an empty database. Depending on your host you may use a program like PHPMyAdmin, or your hosts control panel.
- You can select any name, username and password for the database (just make sure to remember it!). But to make it even easier when you install CMSMS (step 7-10), you can use the following:
- Database name: cms
- Username: cms_user
- Password: cms_pass
- Note: Some hosts only allow you to use one database. Then you will have to use that database (and the username and password that you use to login to your database). If that is the case, you can skip step 6. Only make sure to use a prefix for the tables (step 10 below) that separates the CMSMS tables from other tables that you also may be using in the same database.
- Step 7

- Now, in your browser, type the URL of the directory where you put the files (step 3), e.g. http://www.yoursite.com/cmsmadesimple-1.2.3/index.php. This should take you to the installation wizard. If it doesn't, go to http://www.yoursite.com/cmsmadesimple-1.2.3/install/install.php
- Or change folder name according to your selection
- Step 8
- First select the language. The next screen (see image to the right) is checking that you have set the right permissions. If all tests are succesful, click Continue.
- If you receive any errors, make sure you've given the folders the correct permissions.
- Step 9
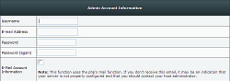
- Next, select the file creation mask (leave at 022). You should now select a user name, e-mail address and password for the admin.
- Note: this is for access to the CMS Made Simple administration once the installation is finished; these are not the user name and password that you gave when creating the database (step 6)
- Step 10

- In the next step you need to enter the database information. For Database name, Username and Password, enter the same information as when you created the database in step 6. In most cases all other settings can be left as they are.
- Ask your hosting company if you encounter difficulties.
- Note: Uncheck the box Create tables if you use an existing database with content that you don't want to remove (for example if you upgrade or repair). Otherwise leave as is.
- Step 11
- In the next screen, if all is [done], everything was installed successfully and CMSMS is ready for use! Congratulations!
- It is wise to write down the CMS Document root, the path to the Document root and the Querystring in case you need this information.
- Step 12
- The final step is to remove the install directory for security reasons, HOWEVER!! If you have performed an upgrade you may need to run a procedure to update the database. Login as administrator - you may see a red warning box - follow the instructions BEFORE deleting the install directory.
- When the red warning disappears then issue
chmod 444 config.php; rm -rf install
- Step 13
- Go to your site and read the first page carefully.
- Have a look at the post installation optional settings like pretty URLs.
This page in:
English -
Deutsch -
Español -
Français -
Italiano -
Lietuvių -
Nederlands -
Norsk -
Polski -
Česky -
Русский -
Svenska -
Tiếng Việt -
عربي -
日本語
简体中文
Shell Installation on Default Plesk for Linux
Plesk running on Linux is a common hosting platform. In the default installation of Plesk the webserver runs as the user "apache" which is a member of the group "psaserv" (Plesk Server). The owner of the hosting account has a basedir restricted userid (usually the same as his ftp username) that is a member of the group "psacln" (Plesk Clients).
In order to run securely in this environment, it is best to set the tmp, modules, and uploads folders as owned by the ftpuser but also the group "psaserv". This allows you to set permissions to 775 so the web server can write to those folders but the world cannot.
So, here is the revised bash shell install process for this configuration:
1. cd (to whatever directory you want to install in)
2. wget http://dev.cmsmadesimple.org/frs/download.php/2536/cmsmadesimple-1.4.1-full.tar.gz (or latest version)
3. tar -zxf cmsmadesimple-1.4.1-full.tar.gz
4. if you are logged in as root do this: touch config.php chown -R [ftpusername]:psacln * // Example: chown -R testclient:psacln * chown -R [ftpusername]:psaserv tmp modules uploads chmod -R 755 * chmod -R 775 tmp uploads modules chmod 664 config.php
if you are logged in as the ftp user do this instead: touch config.php chown -R [ftpusername]:psaserv tmp modules uploads chmod -R 755 * chmod -R 775 tmp uploads modules chmod 664 config.php
5. Now run install script from the web browser http://yourdomain.tld/install
