This page in: English - Deutsch - Español - Français - Italiano - Lietuvių - Nederlands - Norsk - Polski - Русский - Svenska - Tiếng Việt - عربي - 日本語 简体中文
Album
The Album Project Page
- Official page: Offical Album Project page on the CMSMS Forge
- Report a bug (Log in and then click "Submit new")
Useful Programs
You can easy scale down pictures before you upload using Resize :)
Using Album
How to Add Captions To Pictures
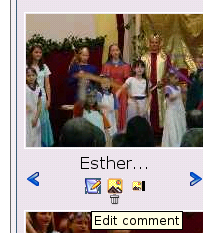
1. Click on the "Edit Comment" icon next to the thumbnail in the Admin Console.
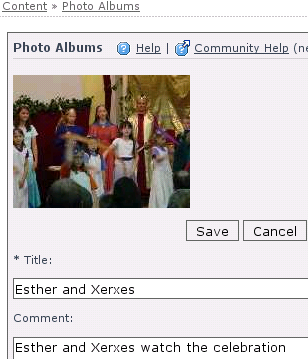
2. Then just type in a title and description and click "Save". :)
Templates
Tip: An easy way to limit the number of colums of pictures
If you edit the album and then go to properties you should be able to set a max row number. But I think that only works with table-based templates, not ones like lytebox.
Instead you can just put a div around your call to Album to force the pictures to fit in a max size:
Something like (remove spaces around < and >):
 < div style="width:600px" >
 {cms_module module="album....}
 < /div >
How to change the links and text in the picture popup for the default Album template
You can change the text in the default Album popup by editing: modules/Album/templates/db/js/thickbox.js (this is not ideal for upgradability, but it seems to work fine)
How to Make the random_image function output only large images
1. Go to Content » Photo Albums
2. Click on the "Templates" tab.
3. Click "Add a template"
4. IMPORTANT: Next to name put "random_image" in the blank (it must be "random_image"!)
5. Paste this next to "Template:"
{foreach from=$pictures item=onepicture}
<img src="{$onepicture->picture}" alt="{$onepicture->name|escape:'html'} {if ($onepicture->comment != "")}-
{$onepicture->comment|escape:'html'}{/if}" title="{$onepicture->name|escape:'html'} {if ($onepicture->comment != "")}-
{$onepicture->comment|escape:'html'}{/if}"/>
{/foreach}
How to Make Picture Titles Show under the thumbnails in the default templates
1. Click on the "Installed Templates" tab. 2. Click on "default" from the list of templates. 3. Under "{* Photo List *}" find the code that looks like this:
<img src="{$onepicture->thumbnail}" alt="{$onepicture->name} -
{$onepicture->comment}" title="{$onepicture->name} -
{$onepicture->comment}"{$onepicture->autothumbnailsize} /></a>
4. After it add this:
<br />{$onepicture->name}
5. Now the link code should look similar to this:
How to use Album with Dynamic Drive's Featured Content Glider (Customisable Animated Slideshow)
1. Visit Dynamic Drive's Featured Content Glider page, follow the instructions there and get Glider working on one of your site's pages with some embedded images as per their example.
2. Once you've got your images gliding successfully, it's time to replace the statically embedded images with dynamic images from CMSMS' Album module- find the following series of glidecontent DIVs (there is one for each image in your slideshow), which is where each image is embedded:
 <div class="glidecontent">
 <img src="http://i15.tinypic.com/72vilba.jpg" style="float: right; padding: 5px"/>Comment text.
 </div>
Remove them all and replace them with cms_module the tag to embed the photos from your Album:
{cms_module module='album' albums='2'}
the above example will embed the album with the ID of 2- you get the Album's ID from going to Content > Photo Albums and on the Albums tab there you will see a list of the albums that you have set up. Each has a unique ID which is listed in the IDs column.
3. Now it's time to create an album template which will list the full size images from the albums that you referenced in step 2. Go to Content > Photo Albums and click on the Templates tab. Click on the Add a template link at the bottom left. In the next page, give your new album template a name- glider would be a good bet. Next paste the following code into the Template field:
{foreach from=$pictures item=picturesrow}
   {foreach from=$picturesrow item=onepicture}
     <div class="glidecontent">
       <img src="{$onepicture->picture}" alt="{$onepicture->name|escape:'html'}" style="float: left; padding: 5px" />
         {$onepicture->comment|escape:'html'}
     </div>
{if ($onepicture->number==$picturenumber and !$picture)}{assign var=picture value=$onepicture}{/if}
   {/foreach}
{/foreach}
Save your new template. The part --style="float: left; padding: 5px"-- allows text to wrap around the images.
4. Next is to reference the glider template that you just created in step 3. Click on the Albums tab in the album module to view a list of available albums. The album that is going to be used with the glider needs to have the glider template attached to it. Click on the album's name, then on the Properties tab. Choose the glider template in the template dropdown at the top.
5. Now reload the page on your CMSMS site which has the Glider code and Album code embedded- all being well, images should now be displayed from your chosen album.
If you would like the images to alternate between floating to the left and to the right then use the following code as the template:
{foreach from=$pictures item=picturesrow}
   {foreach from=$picturesrow item=onepicture}
     <div class="glidecontent">
       <img src="{$onepicture->picture}" alt="{$onepicture->name|escape:'html'}"
{cycle values="style=\"float: left; padding: 5px\",style=\"float: right; padding: 5px\""} />
         {$onepicture->comment|escape:'html'}
     </div>
{if ($onepicture->number==$picturenumber and !$picture)}{assign var=picture value=$onepicture}{/if}
   {/foreach}
{/foreach}
Troubleshooting
How to fix problem with pictures not being added (on upgrades from old versions of Album):
The upgrade script was not written to handle upgrades from some versions, if pictures are not being added, try running this SQL code in phpMyAdmin:
ALTER TABLE `cms_module_album_pictures` ADD `thumbnail_width` VARCHAR( 20 ) NOT NULL , ADD `thumbnail_height` VARCHAR( 20 ) NOT NULL ;
There are 3 different template dropdowns.
- Album List Template: - Choose which template is used for the list of Albums
- Default Template: - Choose the default template that is used for new Albums that you create
- Template: - Choose the template that is used for a specific Album.
Here is how to choose the "Template:" that is used for an Album:
- In the CMS Made Simple Admin Console go to [b]Content -> Photo Albums[/b]
- Click on the [b]name of your Album[/b] on the Albums tab.
- You will now see a list of the pictures in your Album, click on the [b]Properties[/b] tab.
- You will see a dropdown next to the word "[b]Template:[/b]" ([i]not[/i] "Default Template" or "Album List Template:")
- Choose [b]"Thickbox"[/b] from the list of templates
- Click the [b]Save[/b] button
This page in:
English -
Deutsch -
Español -
Français -
Italiano -
Lietuvių -
Nederlands -
Norsk -
Polski -
Česky -
Русский -
Svenska -
Tiếng Việt -
عربي -
日本語
简体中文


